Have a look at the gallery of layouts to see some of the oh so familiar stories, and I can tell you I have been there too in all those situations! - Such a huge pity I was not snapping and scrapping when my girls were younger. Well - I do have one or two real cuties but my daughters would hang me out to dry if I ever printed them - do you think I should ask them for permission and see what they say?
Actually we never had digital cameras, (way back then...groan) and films and processing really was an expense saved for special occasions. These days we do have digital cameras, we can click away and save all the images for free, only printing the ones we choose too.
So keep your cameras handy, take those real life "it's all in a day" photo's and use them to make the best fun pages ever - and remember to write about them too! In years to come they will be absolute treasures to look back on and bring back many memories that would have been forgotten.
Start keeping a journal handy to record the time and place and feelings about the photo - you never know when you will need to refer back to it.
Snap (Pictures) Before You Snap!
From Bonnie Covel from About.com
Digital Scrapping Designs
Digital Scrapping Designs (Est. 11 February 2008) is a collaboration by digital art and digital scrapping friends who helped each other to learn to use Paintshop Pro. Here you will find tutorials, techniques, examples with information about Digital art ideas and digital Scrapping mainly using Paintshop Pro that may be a useful source of inspiration.
Friday, October 16, 2020
Snap Before You Snap
Labels:
Scrapping Inspiration
 Artist exploration, watercolour, creativity, inspirational, digital graphics, Journal Art, Scrapbooking, design, patterns, seasonal art, fun art,
Sunday, June 14, 2020

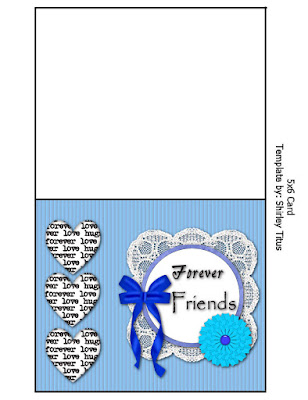
I was looking through a card magazine and saw a card that inspired this. In order to make this, I had to make all of the elements. The bow was a free script that I found on a website, and the lace was a free tube I found on another site. To make the heart element, I had to keep copying and pasting words in typewriter script to make a background. Then I used a heart selection, and eyecandy glass to make a clear heart. I put the words background under the glass heart, and merged it. The background on the card, I used texture>blinds.
The card is at 100 DPI, so to print it out, use card stock, and in the print layout, just pull it over and don't resize. Print out on the card stock, and cut out.each half of the card is 5x6.
The template is by Shirl Titus of sweetestthings.com. Unfortunately, Shirl's site is no longer on the net.
This is just a sample of how you can use the scrapping items we're learning to make in these classes. I titled the card Best Friends after a freebie scrap kit I'm putting together, which is in memory of my best friend who died Jan 14. You're welcome to use it for personal use.
Debi
Labels:
Debi,
Paper Craft
 Artist exploration, watercolour, creativity, inspirational, digital graphics, Journal Art, Scrapbooking, design, patterns, seasonal art, fun art,
Thursday, April 13, 2017
Getting Rid of Those Ugly Jagged Edges!!
Morning everyone. Today I am offering a very benificial tutorial. We all see those nasty jaggies on so many things we make. This can happen at any time and doing the simplist things that you wouldn't think would leave a jaggie ... but it does! It also happens after using the warp brush tool, and many other tools too.
In my examples I am using the Ball and Bubbles Filter I use to make some of my beads. This leaves an unsightly very prominate outer edge I do not want showing, especially because I am a designer and need things to look perfect, lol. I am going to teach you my way of getting rid of these ugly edges and jaggies. You'll end up with much nicer, smoother edges.
What you need:
- PSP, any version
- Gold Ball Preset (if you don't already have it) Download
- or follow this link - https://www.4shared.com/s/fv6CzCd_Zca
- Put the "Preset_BallsAndBubbles_Gold ball.P_.PspScript" in your Preset Folder of PSP in My Documents\MyPSP\your version here\Presets.
Let's get started making a bead :)
New Image 300 x 300 > Transparent > 300 PPI Ellipse Tool set to circle Set color of your choice for Fill Draw out a circle about the proportions as below > Objects/Align/Center in Canvas. Selections/Select All/Selections/Float/Selections/Defloat. (Here out known as Select/Float/Defloat) You should now have something similar to this:
Now we'll apply Balls & Bubbles effect to it. Effects/Artistic Effects/Balls & Bubbles In the Preset drop down list select Gold Ball (attached if needed - put in Preset folder)/Click OK. You should now see this:
See that red outline? (This technique works for those jagged pixels as well) We are going to get rid of that outline left over by the Balls & Bubbles effect (UNLESS - you want to keep it). Select/Float/Defloat > Selections/Modify/Smooth. Use Default Settings (click the curved arrow to make it default) > Click OK > Select/Float/Defloat > Selections/Modify/Contract by 5 > Click OK > Invert/Delete/Select None.
This should now be your end result.
This should now be your end result.
Of course you can play with these settings on anything you make. As you know, not everything will have this large of an edge to remove. You may need to adjust settings, even drop your smooth settings from 10 to 5. **This technique works equally well on those flower petals/objects you have used the Warp tool on!!** Two more examples: These two images are the same. I made a circle using the ellipse tool. Applied a SuperBladePro Preset to it. See how it gave it an ugly white outline? I used the exact method above and the second image is the result. Much cleaner and smoother.
BEFORE
AFTER
Have fun experimenting!! ~Debb: http://shadedezines.blogspot.com
Labels:
Get Rid of Jagged Edges
 Welcome. The things you will find here are all about the things I love ... Digital design, crochet, photography, and more to come. Site will be under construction so bare with me. Thanks for visiting - come back anytime!
Subscribe to:
Comments (Atom)


