Sunday, February 22, 2009

Cut out effect Text


While this technique is not technically Scrapping, it IS one of the most requested tutorials once people have seen the results (this stat, for example). MoonDesigns is no longer being actively updated; she's moved on to soap operas, so you might want to print this out to keep. It has a lot of applications in making stats, scraps, and general PSP. It's simple and, I think, can be done in PSE as well as PSP with little moderation.

- Link for the Photoshop tutorial

The corners I used making this stat are dingbats!

Debi

Tuesday, February 17, 2009

Mouse Pad


Mouse Pad

Hello friends!

My suggestion for you is create a mousepad with our layouts. To start you need the plugin Eye Candy 5 Impact - A fully functional for 30 days Free Demo is available to download HERE

A tube of a mouse, a shape of your choice and a layout ready. Supplies Here, feel free to use it too, This tutorial is free, then you can create layouts and exhibit them in your galleries, provided you do not remove my credits.

You may use any kit you wish.

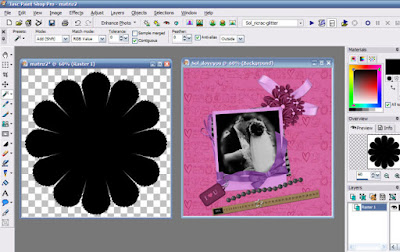
1- Open your material in PSP, open the layout ready choose your choice of shape. Here I used a layout with creation Kit Valentine - Freebie by Tammy.


2- We select the Shape, copy our layout, close the original


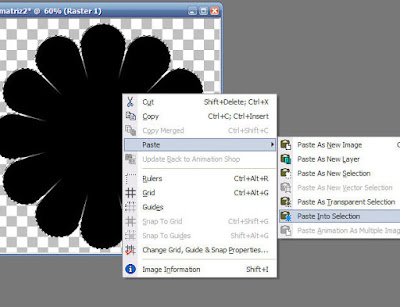
3- Paste the selection with paste into selection;


4- Remove the selection, and now we use the Filter Alien Skin/ Eye Candy 5 Impact/ Bevel;


Settings: Plastic,
Basic: 9.17/68/39.08/0/21
Shade interior marcado
Suface:none
Lighting: 135/45/98/77
Highlight Size:#ffffff
Shadow Color:# a91d5f or according to the color of the layout;
Bevel Profile: Button
OK
5- Now we put our mouse to change canvas size,
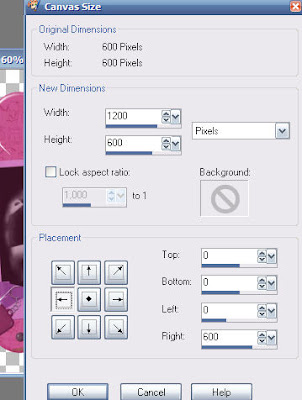

Image Canvas
the following configuration:1200/600/0/0/0/600

6- Open the tube of the mouse, and colorize it, with colour from the layout, copy and paste the past as new layer. Take the bottom layer for the mousepad, a store and the layers. The shadow leave on their own. Save in PNG to be transparent, or JPEG. Here is my result:


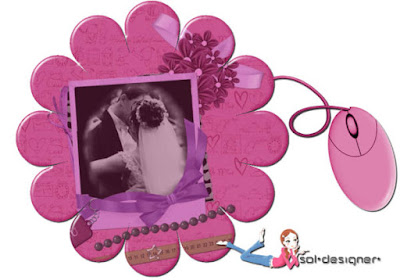
7- I hope you enjoy and are very happy with this technique!

Tutorial By Sol Creations
Fev/2009
Do not remove the credits


Pixel Painting

PIXEL PAINTING

My Challenge today is for you to complete a few very simple Easter pixel painting tutorials from Monti's Pixel Playground : a Basket and 2 or 3 Easter Eggs. The link I'm giving you also has some easy bunny tutorials if you want to have a go at them.

Here is the link to the tutorials : http://www.montispixelplayground.com/index2.html

Scroll down till you get to "Egg Basket"

Notes : I always increase the scale of my work to 800% ~ also I always set my brush to size 2 instead of size 1 .... I prefer the finished size of my project using this setting. Remember .... you can follow the tutorials exactly, or use your own colours etc.

Have fun and please post any results you have, we all love to see what everyone else is getting up to lol!!
Here are my results :


Saturday, February 14, 2009

Ribbons


Hello everyone I am Jeanne,

Everyone's posts have been wonderful and very creative, sometime I hope to have time to do all of them. When I am in creative and design mode I tend to gravitate to soft colors and vintage style. I also like making templates, and elements in grey scale and sepia tone the things I will use alot so they can be recolored. I feel so blessed and honored to be a part of this team of talented and creative designers.

My contribution for you today is a tut from scrap-stuff-with-psp-tutorials. love this site, so many tuts and so little time.

Here is my preview for the suede ribbons, I hope you enjoy the tut.


Here is the link, scroll down to find Suede Ribbons:
http://scrap-stuff-with-psp-tutorials.blogspot.com/

Update April 2017

Unfortunately the above link does not appear to be working at the moment

Here is another link to making ribbons.
http://www.bluebirddesign.net/2008/08/making-ribbons-in-paint-shop-pro.html

Hugs and much love

Jeanne


Friday, February 13, 2009

Basket or wicker basket

Hi

My contribution to help inspire you,  is to make a basket and the tutorial can be found here at this link - then fill the basket with other goodies you have made!

http://graphic-and-arts-by-elle.com/PSPX/Wicker-Basket/Wicker-Basket-Tutorial.htm

2017 - unfortunately the link for the wicker basket appears to be out of order,
Here is a wooden basket tutorial
Here is an artist basket tutorial

If you find a new link please let us know!

I have made these baskets just for help you with the inspiration


So be creative and GOOD LUCK from me too
Hugz
Kicki

Wednesday, February 11, 2009

Decorated frame

Shani's Special Freaky Frame Birthday Challenge


Hello Everyone,
Today's challenge is going to be a frame, but not the normal frame decorating challenge.
This will be along with the birthday celebration theme.
Use the birthday colours already listed here on site, my textures and anything from this kit I don't have a birthday kit so this will suffice, you may recolour items to go along with the frame. Experiment with the bevel effects to your liking, also use plugins and go wild.


Shani

Sunday, February 08, 2009

Scrap Blends

For the second post I have chosen a scrap blend, from PSP-Pals, they are so much fun, and this Tutorial can be so adaptable.


-->
You will need to go to "Scrap Blends" and then "Scrap Blend 15". If you download any materials from here, they are all saved closed, so you will need to open them in PSP to see them. The main thing is to have fun, If you need any help then please get in touch with me pgennery@googlemail.com Thank You.


-->
With this one below I adapted it to suit Spring, I also used a wonderful kit from.
http://www.azyzam.nl/scrapbook/scrapbook.htm unfortunately they are no longer on line.