Have a look at the gallery of layouts to see some of the oh so familiar stories, and I can tell you I have been there too in all those situations! - Such a huge pity I was not snapping and scrapping when my girls were younger. Well - I do have one or two real cuties but my daughters would hang me out to dry if I ever printed them - do you think I should ask them for permission and see what they say?
Actually we never had digital cameras, (way back then...groan) and films and processing really was an expense saved for special occasions. These days we do have digital cameras, we can click away and save all the images for free, only printing the ones we choose too.
So keep your cameras handy, take those real life "it's all in a day" photo's and use them to make the best fun pages ever - and remember to write about them too! In years to come they will be absolute treasures to look back on and bring back many memories that would have been forgotten.
Start keeping a journal handy to record the time and place and feelings about the photo - you never know when you will need to refer back to it.
Snap (Pictures) Before You Snap!
From Bonnie Covel from About.com
Friday, October 16, 2020
Snap Before You Snap

 Artist exploration, watercolour, creativity, inspirational, digital graphics, Journal Art, Scrapbooking, design, patterns, seasonal art, fun art,
Sunday, June 14, 2020

I was looking through a card magazine and saw a card that inspired this. In order to make this, I had to make all of the elements. The bow was a free script that I found on a website, and the lace was a free tube I found on another site. To make the heart element, I had to keep copying and pasting words in typewriter script to make a background. Then I used a heart selection, and eyecandy glass to make a clear heart. I put the words background under the glass heart, and merged it. The background on the card, I used texture>blinds.
The card is at 100 DPI, so to print it out, use card stock, and in the print layout, just pull it over and don't resize. Print out on the card stock, and cut out.each half of the card is 5x6.
The template is by Shirl Titus of sweetestthings.com. Unfortunately, Shirl's site is no longer on the net.
This is just a sample of how you can use the scrapping items we're learning to make in these classes. I titled the card Best Friends after a freebie scrap kit I'm putting together, which is in memory of my best friend who died Jan 14. You're welcome to use it for personal use.
Debi
Artist exploration, watercolour, creativity, inspirational, digital graphics, Journal Art, Scrapbooking, design, patterns, seasonal art, fun art,
Thursday, April 13, 2017
Getting Rid of Those Ugly Jagged Edges!!
Morning everyone. Today I am offering a very benificial tutorial. We all see those nasty jaggies on so many things we make. This can happen at any time and doing the simplist things that you wouldn't think would leave a jaggie ... but it does! It also happens after using the warp brush tool, and many other tools too.
In my examples I am using the Ball and Bubbles Filter I use to make some of my beads. This leaves an unsightly very prominate outer edge I do not want showing, especially because I am a designer and need things to look perfect, lol. I am going to teach you my way of getting rid of these ugly edges and jaggies. You'll end up with much nicer, smoother edges.
What you need:
- PSP, any version
- Gold Ball Preset (if you don't already have it) Download
- or follow this link - https://www.4shared.com/s/fv6CzCd_Zca
- Put the "Preset_BallsAndBubbles_Gold ball.P_.PspScript" in your Preset Folder of PSP in My Documents\MyPSP\your version here\Presets.
Let's get started making a bead :)
New Image 300 x 300 > Transparent > 300 PPI Ellipse Tool set to circle Set color of your choice for Fill Draw out a circle about the proportions as below > Objects/Align/Center in Canvas. Selections/Select All/Selections/Float/Selections/Defloat. (Here out known as Select/Float/Defloat) You should now have something similar to this:

Now we'll apply Balls & Bubbles effect to it. Effects/Artistic Effects/Balls & Bubbles In the Preset drop down list select Gold Ball (attached if needed - put in Preset folder)/Click OK. You should now see this:

See that red outline? (This technique works for those jagged pixels as well) We are going to get rid of that outline left over by the Balls & Bubbles effect (UNLESS - you want to keep it). Select/Float/Defloat > Selections/Modify/Smooth. Use Default Settings (click the curved arrow to make it default) > Click OK > Select/Float/Defloat > Selections/Modify/Contract by 5 > Click OK > Invert/Delete/Select None.
This should now be your end result.
This should now be your end result.

Of course you can play with these settings on anything you make. As you know, not everything will have this large of an edge to remove. You may need to adjust settings, even drop your smooth settings from 10 to 5. **This technique works equally well on those flower petals/objects you have used the Warp tool on!!** Two more examples: These two images are the same. I made a circle using the ellipse tool. Applied a SuperBladePro Preset to it. See how it gave it an ugly white outline? I used the exact method above and the second image is the result. Much cleaner and smoother.
BEFORE

AFTER

Have fun experimenting!! ~Debb: http://shadedezines.blogspot.com
 Welcome. The things you will find here are all about the things I love ... Digital design, crochet, photography, and more to come. Site will be under construction so bare with me. Thanks for visiting - come back anytime!
Gingham
Here's a tutorial for making gingham and with a little creative work, plaid. It's the simplest means I've found for making gingham but one of the more complicated and least effective plaid tutorials I've done, and with the way I love plaids, I assure you, I've done more than my share! Almost every kit I make has at least one plaid in it. But I've not played with gingham for a long time so I'll probably add some in one of my many upcoming kits.

http://www.angelfire.com/art/graphicsbyart/tut6.htmlThose of you familiar with the common means of making checkerboard patterns will find this altogether too familiar. Remember, this tutorial is not for scrap kit making originally but with a little tweaking it can very well be. I would start with a six inch image and work from there. The tile is seamless so you can use it as a fill so long as your stripes are wide enough. Here's the link, I hope you all enjoy it.
Be Witched!
Endora Aphrattos
"Life's a Witch, yeah? So am I!"
Tuesday, April 11, 2017
Scrapbook Page Ideas
Scrapbook Page Ideas
By Rebecca Ludens
Get inspired to create fabulous pages by checking out the work of scrapbookers just like you.
These scrapbook page layouts were created by forum members,
designers, and article contributors to About Scrapbooking.
Learn Scrapbook Techniques
Learn new scrapbook techniques, find step by step instructions, and get ideas for your scrapbook pages in these articles.
Free Trendy Scrapbook Patterns
Designs from nature are currently very popular in scrapbooking. This new gallery contains free paper piecing patterns for a bird, a tree branch, and a tree that you can use for scrapbooking and card making.
Year In Review Scrapbook Page Layout Idea (and Free Sketch)
By Rebecca Ludens
Get inspired to create fabulous pages by checking out the work of scrapbookers just like you.
These scrapbook page layouts were created by forum members,
designers, and article contributors to About Scrapbooking.
Learn Scrapbook Techniques
Learn new scrapbook techniques, find step by step instructions, and get ideas for your scrapbook pages in these articles.
Free Trendy Scrapbook Patterns
Designs from nature are currently very popular in scrapbooking. This new gallery contains free paper piecing patterns for a bird, a tree branch, and a tree that you can use for scrapbooking and card making.
Year In Review Scrapbook Page Layout Idea (and Free Sketch)
Artist exploration, watercolour, creativity, inspirational, digital graphics, Journal Art, Scrapbooking, design, patterns, seasonal art, fun art,
Compatibility Paint Shop Pro
Making images that will work in all forms of Paint Shop Pro
Sometimes we make tubes, brushes, with Newer versions of Paint Shop Pro.
Alas people using earlier versions (like 5 or 7) cannot open these shared items from us.
If you want to save them in a format that it is compatible with earlier versions,
Follow this Tutorial
http://emsportal.info/tutorials/compatibility.shtml
Sometimes we make tubes, brushes, with Newer versions of Paint Shop Pro.
Alas people using earlier versions (like 5 or 7) cannot open these shared items from us.
If you want to save them in a format that it is compatible with earlier versions,
Follow this Tutorial
http://emsportal.info/tutorials/compatibility.shtml
Artist exploration, watercolour, creativity, inspirational, digital graphics, Journal Art, Scrapbooking, design, patterns, seasonal art, fun art,
So You Created a Digital Scrapbooking Kit!
Perhaps you are learning to make your own kits for your own personal pleasure and use.
This can be a very satisfying hobby putting together what you have learned and designed into your own beautiful creations.
Perhaps you have created dozens of kits and you are giving them away as Freebies.
Many people will download them because they are free and why not? This is what you are offering!
Giving away your creations is great and many of your visitors are very grateful for them.
After a while, you think - well the kits are so popular, perhaps you should try selling some of them,
or collecting a small donation for them, to make creating them more worthwhile for you
........then you discover......Not so many downloads anymore.
Also the market is thoroughly saturated with free or for sale scrap kits and crapping elements - this is where you may lose heart and think - this is not for me. The sheer variety and selection is mind boggling.
However if you are determined to create and try selling your creations then you must be fully aware that The Secret might be in presentation or innovation.
Keeping your designs fresh with lots of new ideas is not easy.
Something people want is new fresh trendy and this is hard to keep up with. Suddenly everyone is making something or doing something similar to you and follow the fashions of digital scrapping trends. It is very easy to steal with your eyes and then create something similar.
Hundreds of people joined online groups to learn to create their own digital scrapping stock. Then opened blogs to show and sell and give away their digital scrapping designs and then suddenly hundreds stopped.
Real life, family and work commitments, lack of response, the difficulty in constantly coming up with new ideas and the amount of time involved trying to stay ahead are some of the reasons the hype seemed to diminish. Many blogs have not been looked at by the owners for years and many links are out of date and no longer work.
Journaling became the next buzzword and doodling and bible journaling and adult colouring books!
Presentation makes the kits more attractive. This is why so many "Shoppe's" have Creative Teams.
They need the team, to present the elements of the kit in different styled layouts, to attract your attention to the variety of ways the kit could be used.
One Kit can make a myriad of different layouts, but not everyone looking at your kit preview can see that. They need to see different parts of your kit shown in different styles and layouts. This could make one kit more popular than the next.
You only need to visit scrap boutiques, or Shoppe's, galleries to see the many different layouts created by their teams, you may see the same kits or combinations of kits being used over and over again. The possibilities are too numerous to imagine.
This is why you need to sharpen your skills with layouts.
**Practice making your own layouts.
**Do Layout Challenges
**Spend more time creating layouts
**Spend Less time creating endless Kits
**Use your Layouts to advertise your kits, whether they are free or not.
At the end of the day, you will have had much more fun creating your layouts for the world to see,
than you might have done creating yet another kit.
You might move on to being on a creative team. You might possibly sell more of your kits.
The Digital Scrapbooking world is enormous and extremely competitive, you need to really work hard to achieve any measure of success commercially (selling).
However, if this is purely your hobby and earning few extra coins on the side is just an added bonus,
you will probably still have more interest if you present your kits with previews and a variety of layouts.
xoxoxo pat/PCArt
03 February 2009
This can be a very satisfying hobby putting together what you have learned and designed into your own beautiful creations.
Perhaps you have created dozens of kits and you are giving them away as Freebies.
Many people will download them because they are free and why not? This is what you are offering!
Giving away your creations is great and many of your visitors are very grateful for them.
After a while, you think - well the kits are so popular, perhaps you should try selling some of them,
or collecting a small donation for them, to make creating them more worthwhile for you
........then you discover......Not so many downloads anymore.
Also the market is thoroughly saturated with free or for sale scrap kits and crapping elements - this is where you may lose heart and think - this is not for me. The sheer variety and selection is mind boggling.
However if you are determined to create and try selling your creations then you must be fully aware that The Secret might be in presentation or innovation.
Keeping your designs fresh with lots of new ideas is not easy.
Something people want is new fresh trendy and this is hard to keep up with. Suddenly everyone is making something or doing something similar to you and follow the fashions of digital scrapping trends. It is very easy to steal with your eyes and then create something similar.
Hundreds of people joined online groups to learn to create their own digital scrapping stock. Then opened blogs to show and sell and give away their digital scrapping designs and then suddenly hundreds stopped.
Real life, family and work commitments, lack of response, the difficulty in constantly coming up with new ideas and the amount of time involved trying to stay ahead are some of the reasons the hype seemed to diminish. Many blogs have not been looked at by the owners for years and many links are out of date and no longer work.
Journaling became the next buzzword and doodling and bible journaling and adult colouring books!
Presentation makes the kits more attractive. This is why so many "Shoppe's" have Creative Teams.
They need the team, to present the elements of the kit in different styled layouts, to attract your attention to the variety of ways the kit could be used.
One Kit can make a myriad of different layouts, but not everyone looking at your kit preview can see that. They need to see different parts of your kit shown in different styles and layouts. This could make one kit more popular than the next.
You only need to visit scrap boutiques, or Shoppe's, galleries to see the many different layouts created by their teams, you may see the same kits or combinations of kits being used over and over again. The possibilities are too numerous to imagine.
This is why you need to sharpen your skills with layouts.
**Practice making your own layouts.
**Do Layout Challenges
**Spend more time creating layouts
**Spend Less time creating endless Kits
**Use your Layouts to advertise your kits, whether they are free or not.
At the end of the day, you will have had much more fun creating your layouts for the world to see,
than you might have done creating yet another kit.
You might move on to being on a creative team. You might possibly sell more of your kits.
The Digital Scrapbooking world is enormous and extremely competitive, you need to really work hard to achieve any measure of success commercially (selling).
However, if this is purely your hobby and earning few extra coins on the side is just an added bonus,
you will probably still have more interest if you present your kits with previews and a variety of layouts.
xoxoxo pat/PCArt
03 February 2009
Artist exploration, watercolour, creativity, inspirational, digital graphics, Journal Art, Scrapbooking, design, patterns, seasonal art, fun art,
Tuesday, March 14, 2017
Favourite things layout
Plan & Scrap a Layout of "Favourite Things"
What you need:
1. A Subject. It could be your Son/Daughter, your child's favorite school activities, your Parents, your families Military Member (what Soldier/unit wouldn't love getting these if you printed them as cards!!), your Friend, Yourself, or whom ever you choose.
2. Whether you chose yourself, or someone else, talk to them (now don't talk to yourself, lol. Just kidding ... you know what you like but do some prep work for yourself as well), pick up on keywords something that made their eyes sparkle when spoken of. Ask about their favorite flower, smell, date, poem, singer, poet, memory .... the possibilities are endless!! Get creative!! Take notes then make a list of those favorite things, and your ideas to scrap it.
3. Once you have compiled your list, put in into motion. This is where your creativity will come into play. Come up with images, creative ways to display their fav. poem or quote. Well, I don't need to tell you how to be creative ... I know you all are!!
4. You can make this as any item you wish. It can be a full size layout, a tag sized layout, a brag book page, a whole kit etc. The idea isn't to make you go all elaborate for this challenge, but rather to spark your creativity into trying something new. And if you share a preview with us, all the better!!!! I know I for one would LOVE to see what you can do with this. Please share your results to Art & Digital Art Friends on Facebook :)
**This is terrific for traditional scrapping as well!!
Here is my example

EXPERIMENT-INSPIRE-CREATE
Welcome. The things you will find here are all about the things I love ... Digital design, crochet, photography, and more to come. Site will be under construction so bare with me. Thanks for visiting - come back anytime!
Thursday, February 16, 2017
Forget-me-not
Hi Everyone,
I know a lot of people dislike vectors, so I thought I'd share a simple vector tutorial, which gives a lovely result.
I have used the individual parts to this for a few things. The link for the tutorial is below.http://www.poppyfield.se/forget_me_not.htm
This is my example


 I'm from Sydney, Australia. I'm 48 and married to a lovely guy that I met online almost 9 years ago. I have two girls from my first marriage, aged 18 & 16. We are owned by our 4 cats :)
I've been a computer addict since I first turned one on about 15 years ago and I'm self taught. I am great at troubleshooting software problems. My hubby builds them and I fix them lol. I've done a few online courses in web design and css too. I've been psping for quite a few years now and started out making tags then migrated to making stats for Incredimail. From there I discovered that I could make my own elements by learning digi scrapbooking. I find the addiction is endless lol.
I'm from Sydney, Australia. I'm 48 and married to a lovely guy that I met online almost 9 years ago. I have two girls from my first marriage, aged 18 & 16. We are owned by our 4 cats :)
I've been a computer addict since I first turned one on about 15 years ago and I'm self taught. I am great at troubleshooting software problems. My hubby builds them and I fix them lol. I've done a few online courses in web design and css too. I've been psping for quite a few years now and started out making tags then migrated to making stats for Incredimail. From there I discovered that I could make my own elements by learning digi scrapbooking. I find the addiction is endless lol.
Sunday, January 29, 2017
Beaded Ribbon Drapes

Here is a quick writeup of the ribbon drape thingy I shared ... now mind you I am not a tut writer and am awful about doing this kinda thing soooo I am hoping I didn't leave anything out
Instructions for the ribbon beaded draping
using your pen tool set at beizer curve vector off and connect segments and show nodes on line style solid width ... what ever size you want your ribbon to be anti alias checked
choose the color you want on the edges of your ribbon for foreground color and turn your background color off .... now draw a straight line or curved ... just play around with it ... nothing exact just free flowing here ... lol ... now you should have a solid colored line go to effects > texture > blinds and choose size you want ... now select all > float > modify > contract >choose the width you like for the edge of your ribbon ... don't deselect but choose the pattern or gradient or whatever for your ribbon and fill...deselect ... go to effects .. distortion ... wave ... now play with the horizonal displacement amplitude if you made your ribbon up and down on your canvas ... use the vertical displacement ampitude if you went across your canvas ... now just play with both horz and vert wavelength until you are happy with the angles of your ribbon ... now all you have to do is choose a brad or bead or whatever you like and place how you want it and then using your warp brush ... carefully move each ribbon so that it looks like it is going through or gathered however you like ... kinda push the ends around so they don't look so blunt ... the warp brush is great for getting that twisted effect ... so play play play ... remember there is always the undo mode ... hehehehe ... I gave mine a small drop shadow on each ribbon before merging them
And that's it ...
the example I have inserted is about 400x1800 in size ... I set my pen tool at stroke width of 66 ... contracted 3 ...horiz ampitude set at 5 or there abouts ... I kinda change the settings for each ribbon ... just kinda gives you a guide
Janice S
Artist exploration, watercolour, creativity, inspirational, digital graphics, Journal Art, Scrapbooking, design, patterns, seasonal art, fun art,
Wednesday, January 25, 2017
Create a Calendar using a script

Create a Calendar
using script from Joske (for personal use only)
be sure to read instructions given at the download link
Artist exploration, watercolour, creativity, inspirational, digital graphics, Journal Art, Scrapbooking, design, patterns, seasonal art, fun art,
Sunday, June 12, 2011
Digital Art Friends
Please join us on Digital Art Friends on Facebook
Artist exploration, watercolour, creativity, inspirational, digital graphics, Journal Art, Scrapbooking, design, patterns, seasonal art, fun art,
Sunday, March 08, 2009
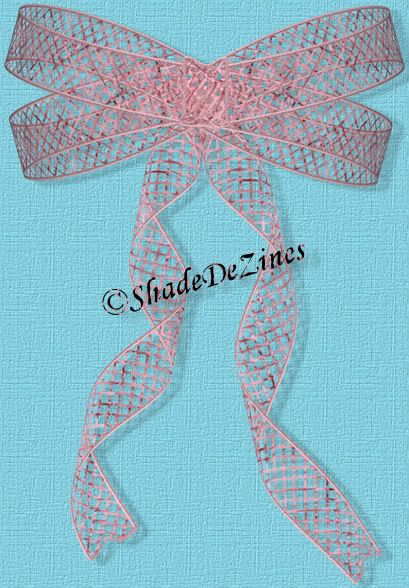
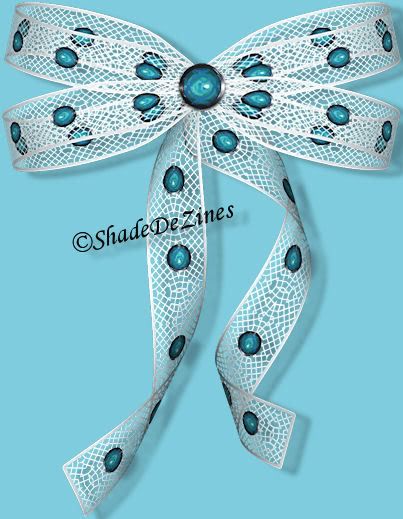
Let's Make A Mesh Bow
What you need:
A. PSP X2 (others should work with some minor changes) You can get a trial version HERE
B. AV Bros Page Curl 2.2. You can get a trial version HERE
C. Netting 02 Texture
D. Eye Candy 5 Impact: Bevel Plugin. You can get a trial version HERE. My Page Curl Presets.
Supplies HERE
(Link updated 1/27/13, sorry for the inconvenience)
Terms of Use: Personal or *Commercial is OK.
*Tutorial, premade images and Presets remain copyright ShadeDeZines. You may use your results however you wish.
A. PSP X2 (others should work with some minor changes) You can get a trial version HERE
B. AV Bros Page Curl 2.2. You can get a trial version HERE
C. Netting 02 Texture
D. Eye Candy 5 Impact: Bevel Plugin. You can get a trial version HERE. My Page Curl Presets.
Supplies HERE
(Link updated 1/27/13, sorry for the inconvenience)
Terms of Use: Personal or *Commercial is OK.
*Tutorial, premade images and Presets remain copyright ShadeDeZines. You may use your results however you wish.
*You may use my presets for your projects PU or CU, but I retain creator credit for them. Meaning, you cannot give them away, sell them in any form what-so-ever. If someone wants them send them to my tutorial page to get the supplies for themselves. It took me some time to get these settings, please respect that. Thanks. Leave file names intact. Do not upload my Tutorial to any other site without my written permission. Do not claim as your own. If you are a group owner and would like to use my tutorial you may provide a link to my tutorial page/blog, but please don’t upload to your site unless I have given you permission to do so.
Lets get started :)
Lets get started :)
1. New Image > 900 x 900 > 300 ppi > Raster > Transparent.
2. Flood Fill the image to make it easier to see your mesh. You can use what ever
color/pattern/gradient you want for the bow. I am doing my example in a pink pattern. You will see my other examples below.
color/pattern/gradient you want for the bow. I am doing my example in a pink pattern. You will see my other examples below.
3. Click the Fill palette to open the Material Properties window. Place a checkmark in the box
next to Texture. Click the down arrow and search for and click on the "Netting02" texture.
Adjust your angle/scale to your desired settings.
Settings for the texture:
Angle: 0
Scale: 65.
next to Texture. Click the down arrow and search for and click on the "Netting02" texture.
Adjust your angle/scale to your desired settings.
Settings for the texture:
Angle: 0
Scale: 65.
4. Make sure your Foreground is set to Null.
5. New Layer
6. Activate your Selection Tool. Selection Type: Rectangle > Mode: Replace > Feather: 0 > Anti-
alias checked. Draw out a Horizontal Rectangle around 50 - 75 x 700 - 800 pixels. Turn on your Rulers if you haven't. View: Rulers. Right-click inside the selection hold and drag it to the center of the image.
alias checked. Draw out a Horizontal Rectangle around 50 - 75 x 700 - 800 pixels. Turn on your Rulers if you haven't. View: Rulers. Right-click inside the selection hold and drag it to the center of the image.
7. Flood Fill with Netting02 Texture.
8. Selections > Modify > Select Selection Borders:
Settings: Outside
Anti-alias: Checked
Border Width: 4
Settings: Outside
Anti-alias: Checked
Border Width: 4
9. Flood fill with desired color. Preferably a matching/complimenting color.
10. Add a texture matching the texture of your netting if you used a pattern with texture.
11. Add a bevel using my Eye Candy Impact 5 preset, or one comparable with PSP's native
Bevel.
Bevel.
12. Deselect: Selections > Select None. You should have something like this:

13. Duplicate the mesh layer: Right-click on the mesh in the Layer Palette and select Duplicate.
Highlight and name the bottom one Backup. Hide it for later.
14. Open Page Curl 2.2. Reset it to Default. Use the provided preset titled:
SD_MeshBowLoop.avcps. Move the loop to the top middle left. Duplicate the loop and Mirror. Position them next to each other.
SD_MeshBowLoop.avcps. Move the loop to the top middle left. Duplicate the loop and Mirror. Position them next to each other.
15. Highlight the Backup layer and duplicate it again. Turn the layer on if you haven't already :)
16. Image > Free Rotate > Left > 90 Degrees. Both layer boxes UNchecked. OK. Move it down
so all of it is inside the image canvas.
so all of it is inside the image canvas.
17. Effects > Plugins > Page Curl 2.2. Reset settings to Default. Click on Main > Load Settings
(Absolute) > Locate and click on Preset: SD_MeshBowRightRibbon.avcps. Click Open.
(Absolute) > Locate and click on Preset: SD_MeshBowRightRibbon.avcps. Click Open.
18. Repeat step 15.
19. Effects > Plugins > Page Curl 2.2 > Main > Load Settings (Absolute) > Locate and click on
Preset: SD_MeshBowLeftRibbon.avcps. Move it over into place.
Preset: SD_MeshBowLeftRibbon.avcps. Move it over into place.
20. We're ready for a center. You can use a brad or make a center. But lets just make a quick one.
21. New Layer. Move it to the top.
22. Selection tool: Type: Rectangle, Mode: Replace, Feather: 0, Anti-alias: Checked.
23. Draw a Vertical Rectangle just wide enough to cover the section where the bow loops meet
and long enough to cover the bottom of the loops.
and long enough to cover the bottom of the loops.
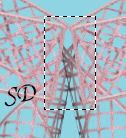
24. Flood Fill with the Mesh Texture. Click to Fill several times. This will make it look fuller and
not so transparent and will help to make it look like it is on top and hiding the lines below.
not so transparent and will help to make it look like it is on top and hiding the lines below.
25. Repeat Steps 8, 9, 10, and 11.
26. Select None
27. Duplicate this layer > Name it backup. Hide the bottom layer.
28. Activate the Warp Brush or you can use the Warp Mesh tool instead. I am using the warp
brush. Gently shape it as needed for the center section of bow. When satisfied, click Apply.
***I have found no perfect science to keep the edges from getting dark using either of these
methods. What I did was use my lasso tool and selected around and removed the black area.
This is a tough method when using mesh because it has so many open areas within it. If you
don't like the results you can always use a brad like I did in one of my other previews below :))
OK ... you can either stop now and merge your layers Visible, or we can duplicate the bows for
another look.
29. Move to a loop layer, Duplicate > Flip and move up into place. When happy with its placement move the layer to the bottom so it is behind the ribbons.
brush. Gently shape it as needed for the center section of bow. When satisfied, click Apply.
***I have found no perfect science to keep the edges from getting dark using either of these
methods. What I did was use my lasso tool and selected around and removed the black area.
This is a tough method when using mesh because it has so many open areas within it. If you
don't like the results you can always use a brad like I did in one of my other previews below :))
OK ... you can either stop now and merge your layers Visible, or we can duplicate the bows for
another look.
29. Move to a loop layer, Duplicate > Flip and move up into place. When happy with its placement move the layer to the bottom so it is behind the ribbons.
30. Repeat for the other side.
ALL DONE !!! Either Save the Backup layers to New Images for later use, or Delete them. Delete the background layer > Merge Visible > Save as a .PNG.
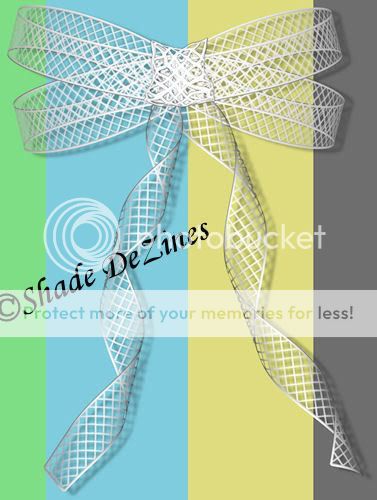
Some Examples :)
ALL DONE !!! Either Save the Backup layers to New Images for later use, or Delete them. Delete the background layer > Merge Visible > Save as a .PNG.
Some Examples :)
 Welcome. The things you will find here are all about the things I love ... Digital design, crochet, photography, and more to come. Site will be under construction so bare with me. Thanks for visiting - come back anytime!
Sunday, February 22, 2009
Cut out effect Text

While this technique is not technically Scrapping, it IS one of the most requested tutorials once people have seen the results (this stat, for example). MoonDesigns is no longer being actively updated; she's moved on to soap operas, so you might want to print this out to keep. It has a lot of applications in making stats, scraps, and general PSP. It's simple and, I think, can be done in PSE as well as PSP with little moderation.
- Link for the Photoshop tutorial
The corners I used making this stat are dingbats!
Debi
Artist exploration, watercolour, creativity, inspirational, digital graphics, Journal Art, Scrapbooking, design, patterns, seasonal art, fun art,
Tuesday, February 17, 2009
Mouse Pad

Mouse Pad
Hello friends!
My suggestion for you is create a mousepad with our layouts. To start you need the plugin Eye Candy 5 Impact - A fully functional for 30 days Free Demo is available to download HERE
A tube of a mouse, a shape of your choice and a layout ready. Supplies Here, feel free to use it too, This tutorial is free, then you can create layouts and exhibit them in your galleries, provided you do not remove my credits.
You may use any kit you wish.
1- Open your material in PSP, open the layout ready choose your choice of shape. Here I used a layout with creation Kit Valentine - Freebie by Tammy.
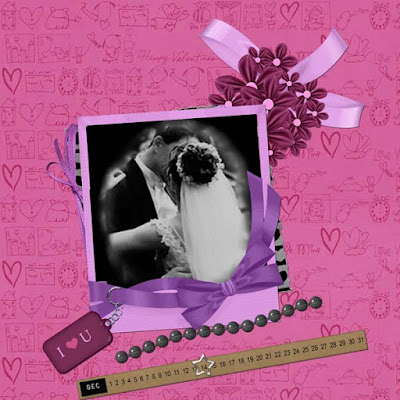
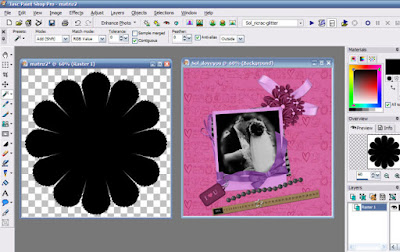
2- We select the Shape, copy our layout, close the original
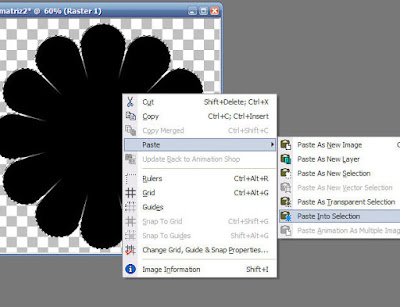
3- Paste the selection with paste into selection;
4- Remove the selection, and now we use the Filter Alien Skin/ Eye Candy 5 Impact/ Bevel;

Settings: Plastic,
Basic: 9.17/68/39.08/0/21
Shade interior marcado
Suface:none
Lighting: 135/45/98/77
Highlight Size:#ffffff
Shadow Color:# a91d5f or according to the color of the layout;
Bevel Profile: Button
OK
5- Now we put our mouse to change canvas size,
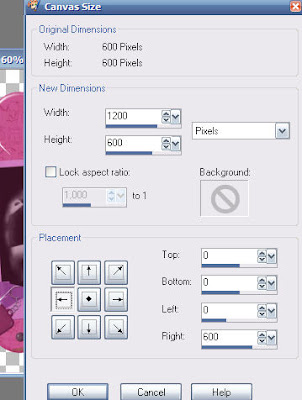
Image Canvas
the following configuration:1200/600/0/0/0/600
6- Open the tube of the mouse, and colorize it, with colour from the layout, copy and paste the past as new layer. Take the bottom layer for the mousepad, a store and the layers. The shadow leave on their own. Save in PNG to be transparent, or JPEG. Here is my result:
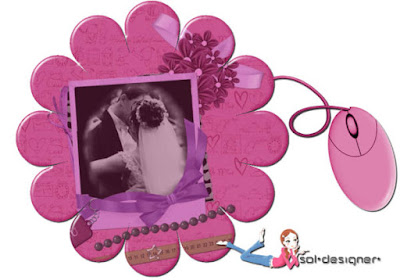
7- I hope you enjoy and are very happy with this technique!
Tutorial By Sol Creations
Fev/2009
Do not remove the credits
My suggestion for you is create a mousepad with our layouts. To start you need the plugin Eye Candy 5 Impact - A fully functional for 30 days Free Demo is available to download HERE
A tube of a mouse, a shape of your choice and a layout ready. Supplies Here, feel free to use it too, This tutorial is free, then you can create layouts and exhibit them in your galleries, provided you do not remove my credits.
You may use any kit you wish.
1- Open your material in PSP, open the layout ready choose your choice of shape. Here I used a layout with creation Kit Valentine - Freebie by Tammy.

2- We select the Shape, copy our layout, close the original

3- Paste the selection with paste into selection;

4- Remove the selection, and now we use the Filter Alien Skin/ Eye Candy 5 Impact/ Bevel;

Settings: Plastic,
Basic: 9.17/68/39.08/0/21
Shade interior marcado
Suface:none
Lighting: 135/45/98/77
Highlight Size:#ffffff
Shadow Color:# a91d5f or according to the color of the layout;
Bevel Profile: Button
OK
5- Now we put our mouse to change canvas size,

Image Canvas
the following configuration:1200/600/0/0/0/600
6- Open the tube of the mouse, and colorize it, with colour from the layout, copy and paste the past as new layer. Take the bottom layer for the mousepad, a store and the layers. The shadow leave on their own. Save in PNG to be transparent, or JPEG. Here is my result:

7- I hope you enjoy and are very happy with this technique!
Tutorial By Sol Creations
Fev/2009
Do not remove the credits
Pixel Painting
PIXEL PAINTING
Scroll down till you get to "Egg Basket"
Notes : I always increase the scale of my work to 800% ~ also I always set my brush to size 2 instead of size 1 .... I prefer the finished size of my project using this setting. Remember .... you can follow the tutorials exactly, or use your own colours etc.

My Challenge today is for you to complete a few very simple Easter pixel painting tutorials from Monti's Pixel Playground : a Basket and 2 or 3 Easter Eggs. The link I'm giving you also has some easy bunny tutorials if you want to have a go at them.
Here is the link to the tutorials : http://www.montispixelplayground.com/index2.html
Here is the link to the tutorials : http://www.montispixelplayground.com/index2.html
Scroll down till you get to "Egg Basket"
Notes : I always increase the scale of my work to 800% ~ also I always set my brush to size 2 instead of size 1 .... I prefer the finished size of my project using this setting. Remember .... you can follow the tutorials exactly, or use your own colours etc.
Have fun and please post any results you have, we all love to see what everyone else is getting up to lol!!
Here are my results :


 I'm 58 years old, I live with my 2nd husband & our 19yr old son. Between us we have 6 children & 9 grand- children. I've recently lost one of my older boys to the Angels.
I work part-time in the afternoons, working on a 6 or 12 head embroidery machine. I've been there nearly 5 years, but still find it fascinating to watch the patterns taking shape.
I'm 58 years old, I live with my 2nd husband & our 19yr old son. Between us we have 6 children & 9 grand- children. I've recently lost one of my older boys to the Angels.
I work part-time in the afternoons, working on a 6 or 12 head embroidery machine. I've been there nearly 5 years, but still find it fascinating to watch the patterns taking shape.
Saturday, February 14, 2009
Ribbons
Hello everyone I am Jeanne,
Everyone's posts have been wonderful and very creative, sometime I hope to have time to do all of them. When I am in creative and design mode I tend to gravitate to soft colors and vintage style. I also like making templates, and elements in grey scale and sepia tone the things I will use alot so they can be recolored. I feel so blessed and honored to be a part of this team of talented and creative designers.
Everyone's posts have been wonderful and very creative, sometime I hope to have time to do all of them. When I am in creative and design mode I tend to gravitate to soft colors and vintage style. I also like making templates, and elements in grey scale and sepia tone the things I will use alot so they can be recolored. I feel so blessed and honored to be a part of this team of talented and creative designers.
My contribution for you today is a tut from scrap-stuff-with-psp-tutorials. love this site, so many tuts and so little time.
Here is my preview for the suede ribbons, I hope you enjoy the tut.

Here is the link, scroll down to find Suede Ribbons:
http://scrap-stuff-with-psp-tutorials.blogspot.com/
Update April 2017
Unfortunately the above link does not appear to be working at the moment
Here is another link to making ribbons.
http://www.bluebirddesign.net/2008/08/making-ribbons-in-paint-shop-pro.html
Jeanne
Friday, February 13, 2009
Basket or wicker basket
Hi
My contribution to help inspire you, is to make a basket and the tutorial can be found here at this link - then fill the basket with other goodies you have made!
http://graphic-and-arts-by-elle.com/PSPX/Wicker-Basket/Wicker-Basket-Tutorial.htm
2017 - unfortunately the link for the wicker basket appears to be out of order,
Here is a wooden basket tutorial
Here is an artist basket tutorial
If you find a new link please let us know!
I have made these baskets just for help you with the inspiration

So be creative and GOOD LUCK from me too
Hugz
Kicki
My contribution to help inspire you, is to make a basket and the tutorial can be found here at this link - then fill the basket with other goodies you have made!
http://graphic-and-arts-by-elle.com/PSPX/Wicker-Basket/Wicker-Basket-Tutorial.htm
2017 - unfortunately the link for the wicker basket appears to be out of order,
Here is a wooden basket tutorial
Here is an artist basket tutorial
If you find a new link please let us know!
I have made these baskets just for help you with the inspiration

So be creative and GOOD LUCK from me too
Hugz
Kicki
Wednesday, February 11, 2009
Decorated frame
Shani's Special Freaky Frame Birthday Challenge

Hello Everyone,
Today's challenge is going to be a frame, but not the normal frame decorating challenge.
This will be along with the birthday celebration theme.
Use the birthday colours already listed here on site, my textures and anything from this kit I don't have a birthday kit so this will suffice, you may recolour items to go along with the frame. Experiment with the bevel effects to your liking, also use plugins and go wild.
Shani

Hello Everyone,
Today's challenge is going to be a frame, but not the normal frame decorating challenge.
This will be along with the birthday celebration theme.
Use the birthday colours already listed here on site, my textures and anything from this kit I don't have a birthday kit so this will suffice, you may recolour items to go along with the frame. Experiment with the bevel effects to your liking, also use plugins and go wild.

Shani
Sunday, February 08, 2009
Scrap Blends
For the second post I have chosen a scrap blend, from PSP-Pals, they are so much fun, and this Tutorial can be so adaptable.
-->

-->

-->
You will need to go to "Scrap Blends" and then "Scrap Blend 15". If you download any materials from here, they are all saved closed, so you will need to open them in PSP to see them. The main thing is to have fun, If you need any help then please get in touch with me pgennery@googlemail.com Thank You.

-->
With this one below I adapted it to suit Spring, I also used a wonderful kit from.
http://www.azyzam.nl/scrapbook/scrapbook.htm unfortunately they are no longer on line.

Subscribe to:
Posts (Atom)